This is my easy, step-by-step guide to learn how to start a blog and make money from it. For 10+ years, I’ve been blogging & making money online—this is the best way to start blogging (and soon make money from your blog) in 6 steps that’ll have you create a blog in 10 to 15 minutes.This is my easy, step-by-step guide to learn how to start a blog and make money from it. For 10+ years, I’ve been blogging & making money online—this is the best way to start blogging (and soon make money from your blog) in 6 steps that’ll have you create a blog in 10 to 15 minutes.
You’ll learn how to start a blog in 6 steps that’ll take about 10 to 15 minutes. Click right here to jump straight down to step #1 and begin now.
Follow these steps to learn how to start a blog and make money today:
How to Start a Blog (and Make Money) in 6 Steps: Easy Beginner’s Guide
The Ultimate Beginner’s Guide to Start a Blog and Make Money Blogging in 2023
- Pick your blog name and niche
- Get your blog online (web hosting)
- Design your blog with a free WordPress theme
- Write your first blog post
- Promote your blog and get readers
- Make money from your blog
Follow these 6 steps to learn how to start a blog and make money today:
If you’re ready to take the leap and learn how to start a blog that can grow into a source of real online income, then let’s dive in.
1. Pick your blog name and niche
First, it’s time to pick a name and niche for your new blog.
Your blog’s name is what readers will see first (like yourblog.com), so it should ideally represent either the general topics you’ll be writing about—or it could be your own name, that of your business, a clever combination of words, or otherwise.
Your blog’s niche is the general topic area that you’ll be focusing your content around. Examples include blog topics like travel, food, fashion, lifestyle, technology, and otherwise. Incorporating a word or two that clearly signals what your content is about, within the name of your blog (like fashionbyjane.com or hikewithryan.com)—will be very helpful for your future blog readers.
2. Get your blog online (web hosting)
The second step in starting a blog, is actually getting your blog online. That’s what a web hosting company will do for you. In this step, you’ll be selecting the blogging platform and web hosting plan you’ll use to get your blog online.
The combination of blogging platform & web hosting I personally use (and that most other bloggers use) is a WordPress blog, hosted by Bluehost. WordPress is a free publishing platform that’s been around since 2003 and now powers more than 60% of all blogs on the Internet. Bluehost is one of the most established, reliable companies in the blog hosting industry. This combination is what we’ll be using to start your blog. Now, let’s get your hosting set up.
Choose your web hosting plan
First, you’ll select a hosting plan (inputting your blog name comes next). Personally, I recommend choosing the Choice Plus plan because it comes with Domain Privacy, which will protect your personal information (your full name, email address, phone number and home address) from being published anywhere online.
As I said above, I recommend choosing the Choice Plus plan, so that you’re getting the Domain Privacy feature that’ll protect your personal information online, but any of these plans will do as you’re starting your blog—and you can add the domain privacy in later during the checkout process for around $1/mo.
Pick your blog’s domain name
Next, you’ll get to the page where it’s time to choose your blog’s domain name:
Create an Account and Getting Your Domain Name with Bluehost or WordPress to Host Your Blog
Once you get to this step in the checkout process, just type in the name of the domain name that you’d like your blog to have (mine is blackmoneymakers.finance.blog)
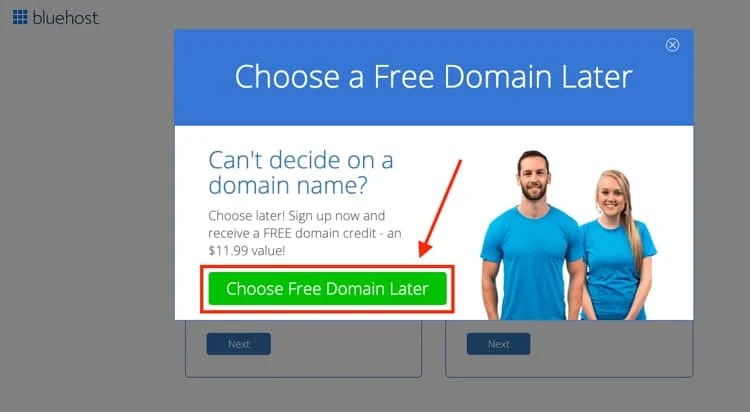
If your domain name of choice isn’t available, you can either try another option that comes to mind—or (what I recommend) select the option to choose your domain name later after getting the rest of your account squared away and taking a little more time to think the name through. Plus, later on down in this guide, I expand some more on how to choose the right name for your blog if you’re not decided yet.
Here’s where you can click to choose your domain later (it’s a popup that will appear if you hover on this page for long enough or move your mouse up toward the top of the page):
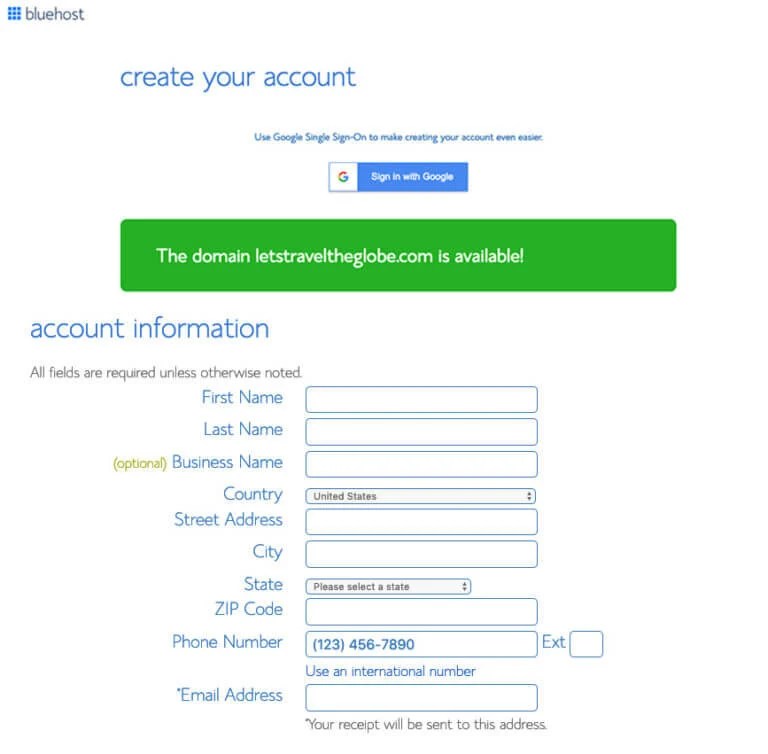
After either choosing your domain name or opting to select it later, you’ll be taken to the final step in the sign up process—creating your account.
Create your Bluehost account
Start by filling in your account details like your name, email address (it’s super important to use an up-to-date email address because this is where your login details and account information will be sent) and address. If you don’t want to enter your information manually, you can connect your Bluehost account with your Google account. Either works!
Select the right hosting plan package
This is where you’ll choose an account plan based on the price you want to lock in and how far in advance you’ll pay for your blog’s hosting.

Note that Bluehost only offers options for you to pay 1, 2, 3 or 5 years upfront. They don’t offer a monthly payment option (because most hosting companies that do offer monthly payments tend to charge a bit more). Even still, with whichever plan you choose, the price works out to be a great deal for starting your own blog and getting it online today.
Which web hosting plan & pricing is best to start a blog with?
Personally, I recommend choosing the “Prime 36 Month Price” if you want to lock in the lowest possible price for your new hosting plan. That’s what I use. And it secures your blog hosting at their lowest rate (and gets you domain privacy) for the next 3 years. And because this low pricing for new customers only applies to the first payment you make, if you were to choose the 1-year plan, your pricing may go up after that first year.
That’s why if you choose the 36-month plan, your pricing will be locked in at this rate for 3 years. For that reason, I recommend going with the longest duration plan that your budget can spring for.
Select the right blog hosting plan package extras (skip all but one)
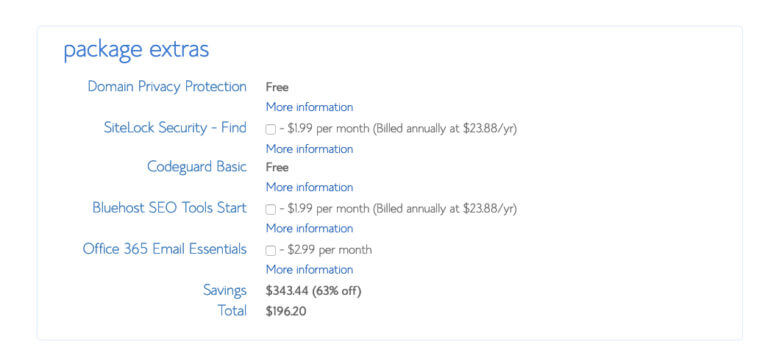
I recommend keeping the Domain Privacy Protection extra, but you can get away with skipping the rest. Later on in this guide, I’ll show you the many free and cheap plugins & tools you can use for things like SEO optimization, additional security and site back-ups, rendering most of the other package extras not necessary.
As I mentioned earlier though, having the domain privacy extra keeps all of your personal contact information (your name, email, phone number and address) private. Now, if you chose the Choice Plus Plan on the previous screen, then your Domain Privacy Protection will be listed as “Free” just like this screenshot above shows—it’s included in that plan.
If you chose a Basic or Plus Plan, then you’ll want to check the box to add Domain Privacy Protection to your order for around $1/mo.
The total you’ll now see is the amount you’re going to pay today. Remember though, you won’t have to pay again for 1, 2, 3 or 5 years depending on the package you chose. Plus, there’s a 30-day money-back guarantee in case things don’t go as planned with your blog.
Enter your billing information
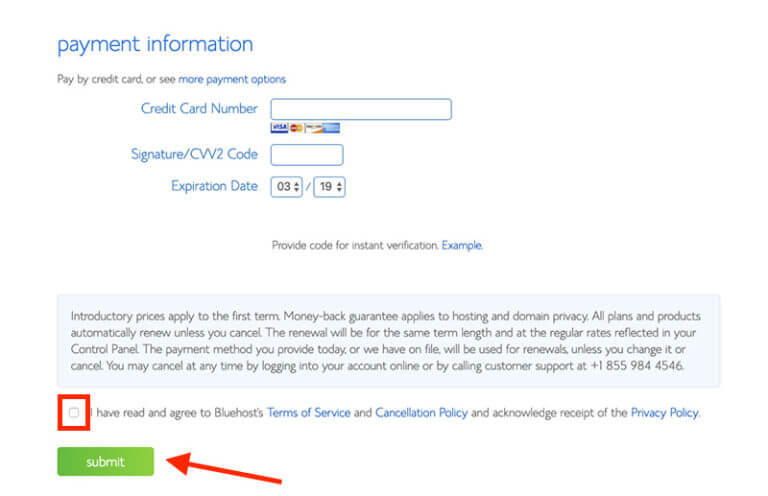
Now you’ll input your billing information, check the box that you agree to Bluehost’s Terms of Service and then hit the green “Submit” button.
Woo! It’s time for a mini celebration 🙂
You’ve officially completed the first major step in starting a blog.
With the initial signup process complete, it’s time to move into the next stage of getting your blog fully setup and optimized.
On the next page, you’ll be guided step-by-step through the process of getting WordPress installed on your blog through Bluehost—and later on in this guide, I’ve got a ton of helpful tips for optimizing your blog, free and cheap plugins you can install to help get your blog looking great, and more.
Now, if you haven’t yet set up your web hosting and want to check out some other options—there are other web hosting providers worth considering.
The 2 best alternative blog hosting platforms worth considering
Dreamhost — I’ve hosted literally dozens of websites on Dreamhost over the years (and I still do). All similar features like 1-click WordPress install, free SSL certificate and site security aside, one of the biggest pros of going with Dreamhost compared to other hosting companies, is that they offer a true plan you can pay month-to-month that allows you to pay for the cost of your blog hosting each month with no strings attached. Here are a few other web hosting companies that also offer monthly payment plans and have 30-day money-back guarantees.
HostGator — The thing that sets HostGator apart from other hosting companies, is their fantastic level of customer support and the fact that they also offer a true monthly payment plan (which helps if you’re starting your blog on a budget). HostGator ranks amongst the largest hosting companies, now powering over 8 million+ websites around the world, making them a great partner to scale your blog with over time.
If you still want to evaluate more of the top blog hosting providers, then head on over to my breakdown of the best web hosting plans for bloggers to review this year. And if you’ve already gotten your hosting taken care of with Bluehost, here’s where you can login to your hosting account with them.
Now we’re at the point in this guide where everything from here on out will be built upon the assumption that you’ve already registered your domain name and chosen the right hosting plan—so if you haven’t done so already, take just a few minutes to quickly get that set up.
To Create your own Website or Blog use this https://wordpress.com/refer-a-friend/0XMPeJQukEEwYVlk7WO3/

Leave a comment